Free Valentine’s Day Vectors From Around the Internet

With valentines Day fast approaching, we thought it would be a good idea to search the RapidShares for Valentines Vectors to be downloaded.  We've made a small list with large packages of Vector Art.  We will also be adding several Valentines Clipart in the next few days for the coming holiday.  Feel free to enjoy them, and share the link on the social media.

1.Valentines Kiss Vector

2. Valentines Day Love Vector

3. Romantic Love Vector

4. Sweet Valentine’s Day Vector

5. Vector With Love On Valentine’s Day

6.Vector Valentine’s Stunning Love Hearts

7.Happy Valentine’s Day Vector

8.Vector Beautiful Love Card

9.Love Hearts And Key Vector

10. Love Hearts Vector

11.Love And Roses Vector

12.Vector Love And Hearts Icons

Read more...

Free Christmas Holiday Vectors

With the Holidays fast approaching, we are beginning the rounding up of decorative holiday vectors.  There will be many more besides these Christmas Vectors, but we thought it would be best to start with the easy ones.  We are actively looking for any and all Hanukkah and Quanza Vectors to offer to the public and anyone willing to share their own are encouraged to contact us.  We will gladly add any and all Christmas, Hanukkah, Quanza, Yule, or any other holiday season Vector Set to our collection to deliver them exposure to the public. 1. 2. 3. 4.

5.

6. 7. 8. 9. 10. 11. 12. 13. 14. Again, please send any and all holiday Vectors, and we will gladly share them with the public for you.
Read more...

Free Vectors For the Month of July

This months collection of 4 free vectors comes from a grouping of 3 different sites.  There are many more we'd like to list, but Christian isin a rush to begin learning to play "Classic Gas"...
Yep, that's really his goal for the day.
That being said, here are the vectors and that link directly to their download locations.

1. Spiral Vectors

2. Skeleton Vector

3. Abstract Vectors

4.  Floral Vectors

http://www.123vectors.com/wp-content/themes/vectors/spiral%20vectors.zipS
Read more...

Fabric Inspired Grunge Brushes – Premium Psdpack

Today, we have a new set of Premium Brushes available for Psd Premium Members. This set was crafted by Grant Friedman of Colorburned and includes 20 high resolution fabric inspired grunge brushes. If your next project calls for a grungy fabric inspired look, then this set is perfect for you. Learn more at the jump!


New Fabric Inspired Grunge Brushes

This new Premium Psdpack Pack is available for Psd Premium Members today and includes 20 high resolution brushes ranging somewhere in the neighborhood of 2500 pixels by 2500 pixels. Members can Log in and Download! Otherwise, Join Now! A preview of the brushes are below.

sample

This new Premium Psdpack Pack was created by Grant Friedman of Colorburned and is available for Psd Premium Members to download today. Grant is the Associate Editor of Psdtuts+ and creates loads of professional quality Photoshop brushes on a regular basis. We’re excited to partner up with him on this release.

pack

Psd Premium Membership

As you know, we run a Premium membership system that costs $9 a month (or $22 for 3 months!), which gives members access to the Source files for tutorials as well as periodic extra tutorials, and Premium Packs like this one! If you’re a Premium member you can log in and download the tutorial. If you’re not a member, you can of course join today!


Read more...

New Tuts+ Site ‘Mobiletuts+’ Launched

We’ve been burning the midnight oil at Tuts+ HQ to bring you Mobiletuts+, the youngest member of the Tuts+ family. It’s all about quality tutorials for mobile developers – all mobile developers, regardless of preferred platform. Topics will include native development with the iPhone, Android, Windows and Blackberry platforms, cross-platform development with tools like Titanium and Phone Gap, and techniques for building mobile web apps and mobile accessible web sites with HTML 5. Visit Mobiletuts+ or read more after the jump.

Whether you want to create the next killer app or become a pioneer of the mobile frontier, we’ve got you covered! In addition to publishing top quality tutorials, articles, and Quick Tips, Mobiletuts+ will be the first Tuts+ site to offer regular multi-media updates on the hottest mobile industry news. We will also be publishing interviews with successful mobile developers to provide you with the most effective real-world development techniques and strategies.

“But I’ve never done mobile development before!”

No problem! Mobiletuts+ will grow with its users. Initially we’ll be publishing lots of content on the fundamentals, like our first tutorial: An Introduction to iPhone SDK Development. We’ll be hitting all the major mobile development platforms with our introductory content, then moving on to the more advanced stuff. If you’re a veteran mobile developer, stick with us! The advanced goodness is almost ready to rumble.


Meet the Editor, Mark Hammonds

    Mark Hammonds, Mobiletuts+ Editor
  • Like all our Tuts+ sites, Mobiletuts+ is helmed by an expert. Mark Hammonds is a software engineer, author, and entrepreneur living in the D.C. / Baltimore area.

    In addition to his work with OmniTI, where he develops high-performance web sites and mobile applications, he is also the co-founder and CTO of Somba Mobile and was among the first developers to publish applications in the iTunes App Store.


Contribute!

If you think you have the skills to create screencasts, written tutorials, articles or Quick Tips for Mobiletuts+ it’s easy to familiarize yourself with the guidelines and become a tutorial author. We’re hungry for user contributions and pay a negotiated USD rate for each tutorial, article or Quick Tip we publish. Submit your concept today!


Read more...

Quick Tip: Use Photoshop to Turn Day Into Dusk

Taking photos at night is not an easy task. Photos taken without adequate lighting often look dim or grainy; they typically don’t look the same as what we see with our own eyes. That is why it is sometimes easier to convert a daytime photo to night using Photoshop than it is to try to take the same photo in the evening hours. In today’s tutorial we will demonstrate a quick technique to make your photos look as if they were taken at night. Let’s get started!


Original Image

Before we begin, let’s take a look at the original image that we will be working from.


Step 1

Open your image in Photoshop. Now create a duplicate of the Background layer. Next we’ll be creating the filter stack which will help us preserve the picture’s details while darkening it. Now convert the duplicate layer to Smart Filters (Filter > Convert for Smart Filters) so that we can edit the filters whenever we need to.


Step 2

This image shows the Filter Gallery with a stack of filters in the lower right panel of the window. This is just an example of how a filter stack looks like – some of you probably didn’t even know that you can do this. We’ll be creating our own stack in a minute.


Step 3

Now, open the Filter Gallery (Filter > Filter Gallery) and we’ll begin making the filters stack. As a note, you could also do this by applying individual filters on the layer, stacking them in the Layers Palette, but I prefer to use this approach because I think it’s quicker this way, and probably because it has a lower impact on memory usage as well.

Next, make sure you clear the stack if you have used it before by clicking the Trash icon at the bottom of the stack panel until you only have a filter left in the stack.


Step 4

It’s time to get messy. For the first item in the stack, choose the Accented Edges filter from the Brush Strokes category. This will accentuate the picture’s edges, preserving its details while darkening. The values used are as follows: Edge Width: 2, Edge Brightness: 38, Smoothness: 5.


Step 5

Next, add a new item in the stack by clicking on the button next to the Trash icon you clicked earlier to empty the stack. This will duplicate the first filter and will be added above it. Now choose the Dry Brush filter from the Artistic category, and give this filter the following values: Brush Size: 6, Brush Detail: 9, Texture: 1. This will help us darken the photo.


Step 6

Finally, add a last item in the stack – Crosshatch from the Brush Strokes category, with the following values: Stroke Length: 9, Sharpness: 6, Strength: 1. This last item will sharpen the other two filters.

Right now, it doesn’t look very promising (check the image below), so we need to fix this. Make sure the smart filter layer is selected and from the Blending modes choose Linear Burn, and then give it a 40% opacity.


Step 7

Now it looks better, but it doesn’t look much different from the original. But after applying some adjustment layers, you’ll see that these filters have a big impact on making it look like it was really shot during the evening.

The first adjustment layer that we’re going to create is Brightness/Contrast. Give it a brightness of -50 and a contrast of 0.


Step 8

Next, add a Hue/Saturation adjustment layer with a saturation of -20 (the other two controls must be 0). Now add an Exposure adjustment layer with an exposure value of -0.45, an offset of 0 and make sure Gamma is set to 1.


Step 9

Wait, there’s something more to add. Add a Vibrance adjustment layer with a vibrance of +20 and 0 saturation. Finally, add a Levels adjustment layer, then select the Red level from the Levels dialog and give it the following values: 0, 0.91, 255. Do the same thing for the Blue level with these values: 0, 0.79, 255. The final result is below!


Additional Example

In this example I’ve used a value of 40% for the layer’s opacity. This value of 40% will be used for large images and landscape pictures (and I’m not referring to the page orientation). In case of a portrait or a small picture, you should use a value of 15%.

Before applying the effect.

After applying the effect.


Download the Action

We have provided the action for this tutorial in the Extras folder for this tutorial’s download which is available exclusively to Psd Premium Members.


Read more...

Create a Beautiful and Dramatic Scene With Photo Manipulations – Basix

Today we will learn a number of techniques to help you add drama to a photo manipulation. We will to do this by learning how to combine two pictures to create a picturesque background, how to draw long hair manually using Photoshop brushes, as well as how to add some adjustment layers to add dramatic effects to the final image. Let’s get started!


Resources


Step 1

Create a new file, size 1600 px wide and 2122 px high at a resolution of 300 pixels/inch. Paste field to new file.


Step 2

Add layer mask. Activate gradient tool. Draw linear gradient from black to white.


Step 3

Zoom in until you can see all the details. Paint unneeded background with black to remove it.


Step 4

Paste sky underneath field layer. The colors will not match the field so we will have to fix it. From the adjustments panel click Color Balance with setting shown below.


Step 5

Download the girl picture. Create new path and with pen tool draw path around her. Avoid selecting her hair. We’ll just recreate it in a few steps.


Step 6

Hit Cmd+Enter to convert path into a selection. Copy the girl and paste it into the new background. Press Cmd+T for transformation and while holding shift drag its corner until she is the appropriate size.


Step 7

Before we proceed with this tutorial, we will need to fix some small details. She has transparent sleeve and it has to reveal some background behind her. To do this, add layer mask, select soft brush with low opacity (10-20%), then paint it with black.


Step 8

Activate field layer. Select some field behind her. Hit Cmd+J to duplicate it to a new layer. Then hit Cmd+shift+] to move it to the top layer.


Step 9

Add a layer mask to the new field. For masking grass, Photoshop has a very useful brush in its default set, named Dune Grass. So, right click and select it. Remove the check mark in front of Color Dynamics.

Next, make sure your foreground color is set to black and layer mask is selected. Start painting until the girl looks like standing in the middle of the field.


Step 10

To strengthen the illusion that the girl is standing inside the field, it’s a good idea to have something in front of her. Change our brush to standard round brush, paint some flowers with white to reveal it.


Step 11

Now let’s draw her hair. But before doing that, make sure the layer mask is active. Paint her hair with black using a soft, low opacity brush until it is transparent.


Step 12

Load the hair brush set. This set consisted of some long premade hairs. Using the brush tool, Cmd+click her hair to sample its color. Open brush panel (F5), click and drag the inside preview box to rotate brush tip. Once you’ve found perfect size and position click to draw an instant long hair. To get a natural color, be sure to sample various color from the hair.

Repeat this step until you have enough hair.


Step 13

After step 12 you may find that the result isn’t entirely realistic. If you look closely you may find that there are repeating objects in her hair. This is a common problem when using premade brushes. The best way to avoid this is by drawing some hairs manually.

Grab the hair brushes set from here. Lower your brush opacity to 15-25%. If you use a tablet, then that’s a good thing. You can activate its Pen Pressure from the Brush Panels.

Manual painting is not easy. It may help to work with a lot of layers. That way you can always delete layers that you don’t like. Below are the steps I took while creating the hair.


Step 14

Now, we need to add some lighting to the girl. To do this we’ll use non-destructive dodging and burning. Hold cmd and click New Layer icon. Choose Use Previous, Mode: Overlay, and Fill with.

Activate burn tool, set opacity to 20% and start painting to make her darker. Do the same with the dodge tool for opposite effects. Remember, if you hold alt while dodge tool selected, then you’ll have burn tool. Same thing happen to burn tool.


Step 15

Now, I’ll add dark border around the image. Hit ctrl+A to select all. Click Edit > Stroke. Use very large width and click OK. Soften the border using Gaussian Blur with a very big radius.


Step 16

Hit ctrl+T. Hold ctrl and drag its corner until you find nice lighting.


Step 17

To add fake light draw a poligonal selection and fill it with white. Add very big Gaussian Blur and lower down layer’s opacity to 30%.


Step 18

Draw the girl’s shadow on the field.


Step 19

Grab the butterfly set. The butterflies are already in a transparent png file, so you just need to select it and drag it to the image. Resize it to match its proportion. Don’t forget to add shadows for a realistic look.


Step 20

Load the floral brushes. Try to experiment with the brush shape. Combine them to get a unique shape like I did here, then add some text in the English font found from dafont.


Step 21

For final adjustment, select the sky layer and use Brightness/Contrast to raise its Lightness. I also added an adjustment layer Photo Filter with a warming filter on top of the image.


Conclusion

I hope you have enjoyed this tutorial and learned something new. You can view the final image below or view a larger version here.


Read more...

Interview With Fantasy Artist Skam Works

Artist Maksimilijan Gecevic, better known as Skam, is a master of producing fantasy artworks. His visuals show vivid events unfolding in practically every illustration he creates. In our interview Skam talks about the benefits of being in a design collective as well as some of his upcoming projects. So let’s get into another interview with a great artist.

Q Welcome to Psdtuts+, please introduce yourself. Could you tell us where you’re from and how you got started in the field?

Hello, glad to be here! My name is Maksimilijan Gecevic and I am from Zagreb, Croatia. I went to a School of Applied arts and I’m currently finishing Faculty of graphic arts in Zagreb. Before I started doing digital artworks I was more into traditional techniques as it was mostly what we learned in school; the basics of traditional art. I got more involved in digital art in college where I started to combine those two techniques but later I found myself creating digital art and graphic design. It all started when I was creating some album covers, posters and logos for fun. But now I rarely sit and draw something traditional. I still draw sketches or doodles for some digital works, and knowing the basics really helps to improve digital artworks later on.

Q All your art has amazing imagery in it, where do you get the inspiration to create scenes like “Evil” and “Dreaming?”

Well, it depends. I get inspiration from everywhere, sometimes ideas just pop into my head. I see a movie or read something that gives me an idea. I like to think of a background story for every piece that I make, so basically, I do as much daydreaming as possible so I can come up with great ideas.

Q You are a member of SlashTHREE a great design collective, in your opinion what are the positives of joining a design collective and submitting your work. Has it benefitted you in any way yet?

I joined SlashTHREE about a year ago, and I have definitely improved since then because the artists there push each other to work on a higher level, giving each other critiques, pointing out things you might not notice, and they don’t let up until you show some progress. But seriously, joining collectives are great for artists to improve and grow. In the end, it gives more exposure to your work. So yeah, I definitely benefitted from it.

Q “Devotion” is a beautiful piece that was featured for SlashTHREE’s latest pack. Please talk about how you made this incredible illustration and what this piece is showing us.

With Devotion, I was inspired by couple of movies I saw with aliens so I wanted to create something with that theme, but in a way to show different kinds of connections, or call it relationship between humans and aliens, in a way I see it if something like that would ever happen. Basically the story itself is up to viewers to imagine, but one of the ideas was actually a love story behind it all. It was created as half manipulation and half illustration because I’m trying to include more painted and illustrated elements to my works so they could be less "cold“ like when they are 100% manipulated, but still on another level when there is some mixed media in it. The ship was mostly painted with some manipulated details, while cityscape was a stock, same for the girl which was exactly what I was looking for in this piece so in the end it turned out like I wanted to. Glad you liked it!

Q All of your fantasy scenes look absolutely seamless with the photo-manipulation techniques. Talk a little about what you put into them when making these illustrations.

I try to include both manipulated and painted elements in my work and blend them together in the end. The key to making these illustrations work is the details. Correct lighting is very important and it’s something that you can’t really learn from a tutorial; you really have to trust your own eye and make those decisions on your own. It is really important to learn, observe, and explore.

Q What plans do you have for the future of your graphic design career? Any upcoming projects you would like to talk about?

Right now my main goal is to finish college and create as many pieces as possible. I would love to make some kind of art book in the near future and I am working on some projects that are still in preproduction for a computer game but it’s still a bit early to make any announcements at this time. A bit further in the future, I hope to have my own design studio and do what I do now but I suppose we shall see how that goes.

Q Are there any specific techniques you use when designing that you would suggest to someone who is starting out in the same field as you?

I can’t say that there are any specific techniques that I use but I think the most important thing that any designer can do is pay attention to details, highlights, as well as depth of field; which can bring a new dimension to a piece. My best advice to a young designer is to experiment and search for tips on their own. When create something, feel free to make things your own way because that is what will become your signature.

Q Thanks again for providing Psdtuts+ with this opportunity to interview you. Any final thoughts for our readers?

My pleasure, and thank you for having me! Thanks to everyone for reading this and I hope that I have inspired at least some of the young designers out there. Keep working, don’t rush, don’t give up and maybe we can collaborate on some projects in the future!

Where to find on the Web

Read more...

40 Beautiful And Amazing Aquatic Life Photos

By Obaid ul Rehman About 70% of earth surface is covered by water. Aquatic life is quite adventurous and is vastly diverse. Life under water is full of many beautiful creatures which are rarely seen and many people can’t even name them. People love to see aquatic life and the unique creatures found in the oceans, for this we have compiled this post that is purely based on aquatic theme. Let us take a close look at these wonderful masterpieces of photography. We hope that you’ll like it and do not forgot to share your comments. Clownfish 10-water in 40 Beautiful And Amazing Aquatic Life Photos Surrounded 1-water in 40 Beautiful And Amazing Aquatic Life Photos Bend 2-water in 40 Beautiful And Amazing Aquatic Life Photos Sonata 3-water in 40 Beautiful And Amazing Aquatic Life Photos Seahorse 4-water in 40 Beautiful And Amazing Aquatic Life Photos Catch me if you can 5-water in 40 Beautiful And Amazing Aquatic Life Photos Angry 6-water in 40 Beautiful And Amazing Aquatic Life Photos Deep Red Sea 7-water in 40 Beautiful And Amazing Aquatic Life Photos Coral tree 8-water in 40 Beautiful And Amazing Aquatic Life Photos Dreaming Jellyfish 9-water in 40 Beautiful And Amazing Aquatic Life Photos Tentacles 12-water in 40 Beautiful And Amazing Aquatic Life Photos Turtle 32 45-water in 40 Beautiful And Amazing Aquatic Life Photos Dolphins 13-water in 40 Beautiful And Amazing Aquatic Life Photos Barbed Skate 14-water in 40 Beautiful And Amazing Aquatic Life Photos The Cardinal & the Clowns 15-water in 40 Beautiful And Amazing Aquatic Life Photos Kiss of the Mandarin 16-water in 40 Beautiful And Amazing Aquatic Life Photos Underwater bridge 17-water in 40 Beautiful And Amazing Aquatic Life Photos Underwater Forest 18-water in 40 Beautiful And Amazing Aquatic Life Photos Underwater garden 46-water in 40 Beautiful And Amazing Aquatic Life Photos Aquatic Life 04 19-water in 40 Beautiful And Amazing Aquatic Life Photos Cuddly Cuttlefish 20-water in 40 Beautiful And Amazing Aquatic Life Photos Sea slug 7 21-water in 40 Beautiful And Amazing Aquatic Life Photos Roots 22-water in 40 Beautiful And Amazing Aquatic Life Photos Singapore 1 23-water in 40 Beautiful And Amazing Aquatic Life Photos Porcelain crab 24-water in 40 Beautiful And Amazing Aquatic Life Photos Squirt… 25-water in 40 Beautiful And Amazing Aquatic Life Photos Clown triggerfish 26-water in 40 Beautiful And Amazing Aquatic Life Photos Underwater 27-water in 40 Beautiful And Amazing Aquatic Life Photos Anenome like a rubber ball 28-water in 40 Beautiful And Amazing Aquatic Life Photos The Jetty 43-water in 40 Beautiful And Amazing Aquatic Life Photos Meeting Of The Jelly Fish 31-water in 40 Beautiful And Amazing Aquatic Life Photos Eel 33-water in 40 Beautiful And Amazing Aquatic Life Photos Amphiprion ocellaris 34-water in 40 Beautiful And Amazing Aquatic Life Photos Silhouette of caretta 35-water in 40 Beautiful And Amazing Aquatic Life Photos Nautilus 36-water in 40 Beautiful And Amazing Aquatic Life Photos Anthozoa 39-water in 40 Beautiful And Amazing Aquatic Life Photos Sea Dragon 40-water in 40 Beautiful And Amazing Aquatic Life Photos In the Space 41-water in 40 Beautiful And Amazing Aquatic Life Photos Hammer! 42-water in 40 Beautiful And Amazing Aquatic Life Photos Lunch hmmm 44-water in 40 Beautiful And Amazing Aquatic Life Photos
Read more...

Quick Tip: Create a Wood Panel Texture in Photoshop

In today’s quick tip tutorial we will demonstrate how to create a wood panel texture in Photoshop. Let’s get started!

Step 1

Start by opening a new document. For this tutorial, I chose 900 x 600 pixels with a transparent background. Fill the document with #473722

Step 2

Duplicate layer 1 and name this duplicate "fibers". Set your foreground color to #746045, and then go to Filter > Render > Fibers and use the following settings:

Step 3

Hit “OK” and you should end up with the following:

Step 4

Duplicate the previous layer and name it "knots". We are now going to add what I call knots in the wood. To do this, go to Filter > Liquify. In the upper left-hand panel, select the Twirl Clockwise Tool (C). On the right side panel, your settings may differ from mine depending on the size you made your document, but for the sake of this tutorial your settings should match mine: Brush Size – 151, Brush Density – 62, Brush Pressure – 100, Brush Rate – 50. Leave all other settings as is. On your document, click in the desired spot and quickly drag upwards or downwards with your mouse button still pushed. You should have something similar to this:

Step 5

Make a new layer and name it “separator 1?. We are now going to make the notches or separators in the paneling. Select the rectangular marquee tool and set it to a fixed ratio with a width of 4px and height of 600px and then place it somewhere near the left side of your document. Fill this block with #806d53. Should look like the following:

Step 6

Now we make the line look more realistic! Double click the separator 1 layer to bring up the blending options and match it with the following settings:

Step 7

Duplicate your first separator about 4 different times and place them so that they’re not evenly spaced. For added touches, you can place some text that looks as if it was carved in, like so:

Final Image

You’re all finished! I hope you enjoyed this tutorial.
Read more...

Gorgeous Geometric Designs

Advertisement in Gorgeous Geometric Designs
 in Gorgeous Geometric Designs  in Gorgeous Geometric Designs  in Gorgeous Geometric Designs

By Tim Mercer

Geometric art has been around since antiquity. From the ancient Greek to the native Americans, peoples all over the world throughout time have produced geometric works of art. Geometric designs tend to have a more rigid quality to them than organic based designs. Whether it’s minimalist and simple or very complex, many geometric designs are made up of rather simple shapes. Today we present 40 Gorgeous Geometric Designs to inspire you. Be sure to check out the artist’s other works by clicking on the images.

Beautiful Geometric Designs

Andy Gilmore
This Mini Cooper looks awesome with a geometric design on it, turning an ordinary car into a work of art.

04-2minich05 in Gorgeous Geometric Designs

This symmetrical design is a great juxtapose between cool and warm colors as well as rigid and organic lines .

170 05-18-09b in Gorgeous Geometric Designs

Niark1
This artist make use of simple geometric shapes to create some cool characters. While there are some organic elements, this piece is dominated by rigid shapes.

789721240843430 in Gorgeous Geometric Designs

Many native American designs incorporated the zig zag lightning bolts and other geometric elements represented in this piece.

789721240843395 in Gorgeous Geometric Designs

Nacho-Gil
This zebra made of triangles demonstrates how geometric designs can even convey the most organic of forms.

001 in Gorgeous Geometric Designs

Another example of organic forms being created from geometric shapes is this mountain lion made of triangles. These pieces remind us that math and geometry are in everything we see.

002 in Gorgeous Geometric Designs

Graphic Nothing
This geometric pattern plays tricks on your eyes. As intriguing as it is, you can’t stair at it too long before your eye start to strain.

3789130164 830854cc45 in Gorgeous Geometric Designs

This design uses only triangles to create an interesting pattern. The colors used here are reminiscent of old school 3D.

Graphic-nothing in Gorgeous Geometric Designs

Chobopop
Chobopop’s geometric animal series features different animals made up of simple shapes. Mostly comprised of triangles, this image of a bear is stylistic, expressive and colorful.

3550509815 E2db855286 in Gorgeous Geometric Designs

Again, Chobopop make good use of the simple triangle. This time around he imagines a mounted deer head in great style.

3586067051 97fd59a330 in Gorgeous Geometric Designs

Elijah
This piece looks like a sheet made of little glass tiles. You can almost see it move.

3124543336 58e55079a4 in Gorgeous Geometric Designs

Phil Chang
The more you look the more you see in this space scene.  It combines geometric design elements with those of a more organic feel like the astronaut.

544561207048001 in Gorgeous Geometric Designs

Charley Harper
Charley Harper is well known for his beautiful geometric designs and this one is particularly interesting with its pinstripe look and great sense of balance.

1448115001 Bcce16670a O in Gorgeous Geometric Designs

This beautifully simple design is of a turtle peeking out through his shell. This one has great complimentary colors and clean lines.

Harper2large1 in Gorgeous Geometric Designs

Gretchen Nash
The intricate patterns and geometric shapes that make up the owl in this piece are really superb. The use of negative space and the contrastingly simple branch make it even more delightful.

Gretchenetc in Gorgeous Geometric Designs

Iunewind
This 3D design is absolutely fantastic with its interesting shapes, great patterns and cheerful colors.

Ljnnkjnknknknknknkn in Gorgeous Geometric Designs

This awesome illustration by Iunewind resembles a cityscape. The beautiful colors, patterns and shading all make this one a real jewel.

Rrrrr in Gorgeous Geometric Designs

MWM Graphics
Not only are the shoe designs really cool but the abstract backgrounds give the pieces a youthful and enthusiastic feel.

502421221970153 in Gorgeous Geometric Designs

These snowboard look awesome with these geometric designs on them. The shapes and colors use in each design represent the different seasons perfectly.

502421221970025 in Gorgeous Geometric Designs

Cesar Gomez
This piece by Cesar Gomez has a pleasing contrast between light and dark, cool and warm.

1303131268083270 in Gorgeous Geometric Designs

The eye naturally moves upward in this design as if ascending into the heavens.

1303131268084118 in Gorgeous Geometric Designs

Jeff Jagunich
The soft feel of the watercolor bleeding into the canvas stands in stark contrast to the geometric shapes and lines in this watercolor painting.

11982812512375621 in Gorgeous Geometric Designs

This watercolor creation has a feeling of expanding chaos.

1198281251237750 in Gorgeous Geometric Designs

Tomas Brechler
This gorgeous poster design for the Omega Code looks like some sort of nebula that creates triangles instead of stars.

511581237691611 in Gorgeous Geometric Designs

6ra99a
This piece has a great sense of movement and speed.
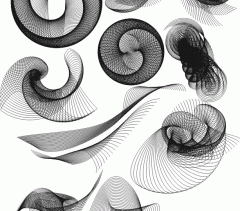
1252191038476 F in Gorgeous Geometric Designs

Ciokkolata
This spiral design really draws you in. Fantastic colors and great movement make this one a stand-out.4203789145 41a4ca1ed4 in Gorgeous Geometric Designs

Created with simple circles, this design really draws the eye toward its center. The color pallet is quite pleasing as well.

3072119520 D1af0b41de in Gorgeous Geometric Designs

Elodole
Made by cutting and folding paper, this piece reminds me of an MC Escher drawing.

4071095205 35545edc8d B in Gorgeous Geometric Designs

This creation has an architectural feel to it. Notice that both of these complex looking pieces were made with only three folds in the paper.

4057249955 73d01cae7d in Gorgeous Geometric Designs

Dave Bollinger
This geometric design has a great sense of depth, inviting the eye to explore its depths.

2385573036 6975a48c6a in Gorgeous Geometric Designs

Superb shading makes this design really pop. The absence of color really puts the emphasis on the 3 dimensional form.

3041525353 B53e887282 in Gorgeous Geometric Designs

Seize Happywallmaker
Painted using acrylics, this design is the definition of simplicity. The use of negative space as well as a great color pallet make this one quite compelling.

3334508221 64dce9eba0 in Gorgeous Geometric Designs

This design, though abstract in nature seems to be looking at you as you look at it. Great colors, simplicity and symmetry come together beautifully in this work of art.

4067480621 7c97cb2f02 B in Gorgeous Geometric Designs

Ghee Beom Kim
This piece from Mr. Kim is an optical illusion. Not only does it look great with its wonderful colors but it appears to be moving.

Kim1 in Gorgeous Geometric Designs

This geometric design has a yin-yang quality to it. The simple pattern has an interesting affect on the eye.

StarryNight in Gorgeous Geometric Designs

Richard Thompson III
The following faces were created by combining photographs and geometric illustrations. The outward projecting lines in this one convey a sense of enthusiasm.

806941260051170 in Gorgeous Geometric Designs

The facial expression combined with the radiating pattern in this work give it a feeling of peace and happiness.

806941260051447 in Gorgeous Geometric Designs

Marc Mckie
The following works of art from Marc have stunning colors and gorgeous designs. This one uses shading and highlight to give it a 3D look.

3751491193 26b3d860d7 in Gorgeous Geometric Designs

This design, with its vanishing point perspective and many layers has a sense of super fast movement towards the center.

3769856917 E46e8465f01 in Gorgeous Geometric Designs

With its wonderful colors and fun shapes this piece reminds me of a circus tent. Yet another awesome creation from Marc.

3751491589 C5aee3fca8 in Gorgeous Geometric Designs

Further resources

Read more...